|
<< Click to Display Table of Contents >> W2D Web Interface Setting up |
  
|
|
<< Click to Display Table of Contents >> W2D Web Interface Setting up |
|
| 1. | Get the hardware ready. Build your model with Webserver Setup Block + UART Setup Block |
| 2. | Download the latest disk image from HERE |
| 3. | Open Chrome Browser and go to (your configured IP)-----> 192.168.1.30/upload.html |
| 4. | Input system/upgrade as a remote directory, then choose file (you just download), then click Upload. Wait until success, or try again if fail. |
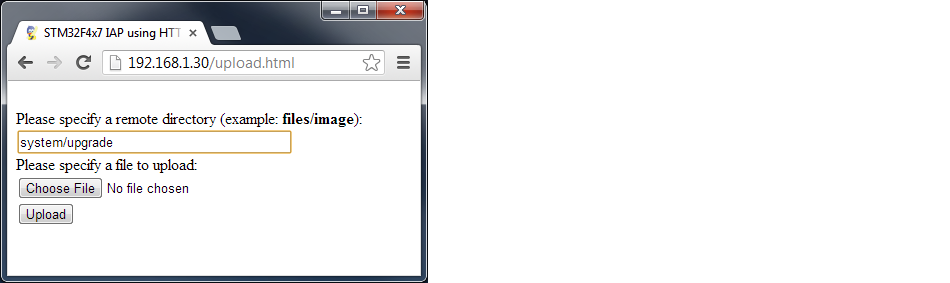
| 5. | MCU webserver will be reset automatically, then W2D will be ready. |
Open your Chrome Browser and point to your MCU Webserver address (192.168.1.30 as demo). It will direct you to login.html page. Please wait here at the login screen about a couple minutes for W2D to initialize the database for the first time.
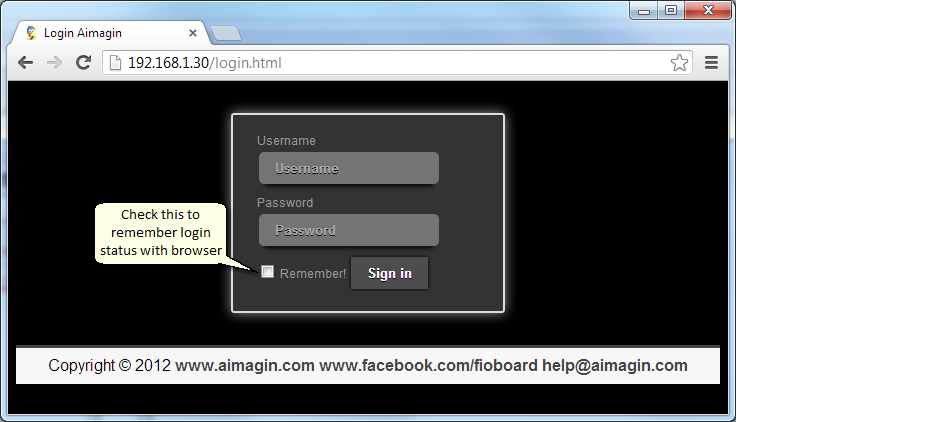

After the initialization process finished, sign in with default username:admin and password:admin . It will direct you to main page.
If the initialization process stop in the middle, please delete database file from micro SD card on the SQLite module and refresh login screen again.
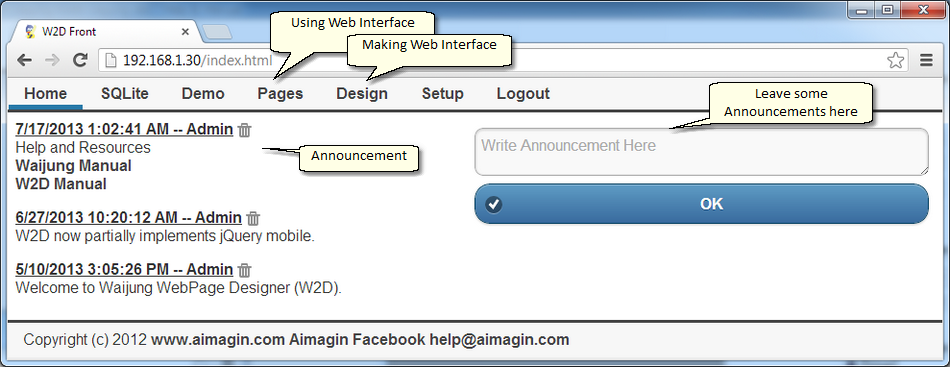
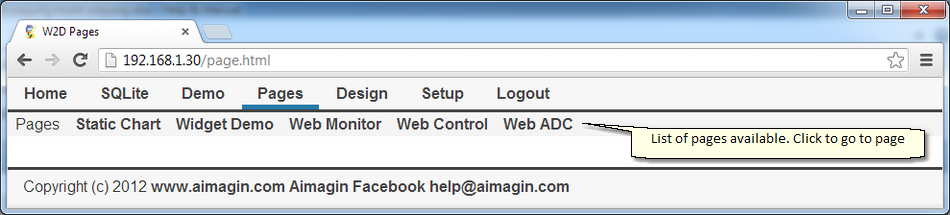
Click menu "Design" to start designing your web interface. Then click menu "Pages" to load up the pages you design. The rest of the menus are described here.
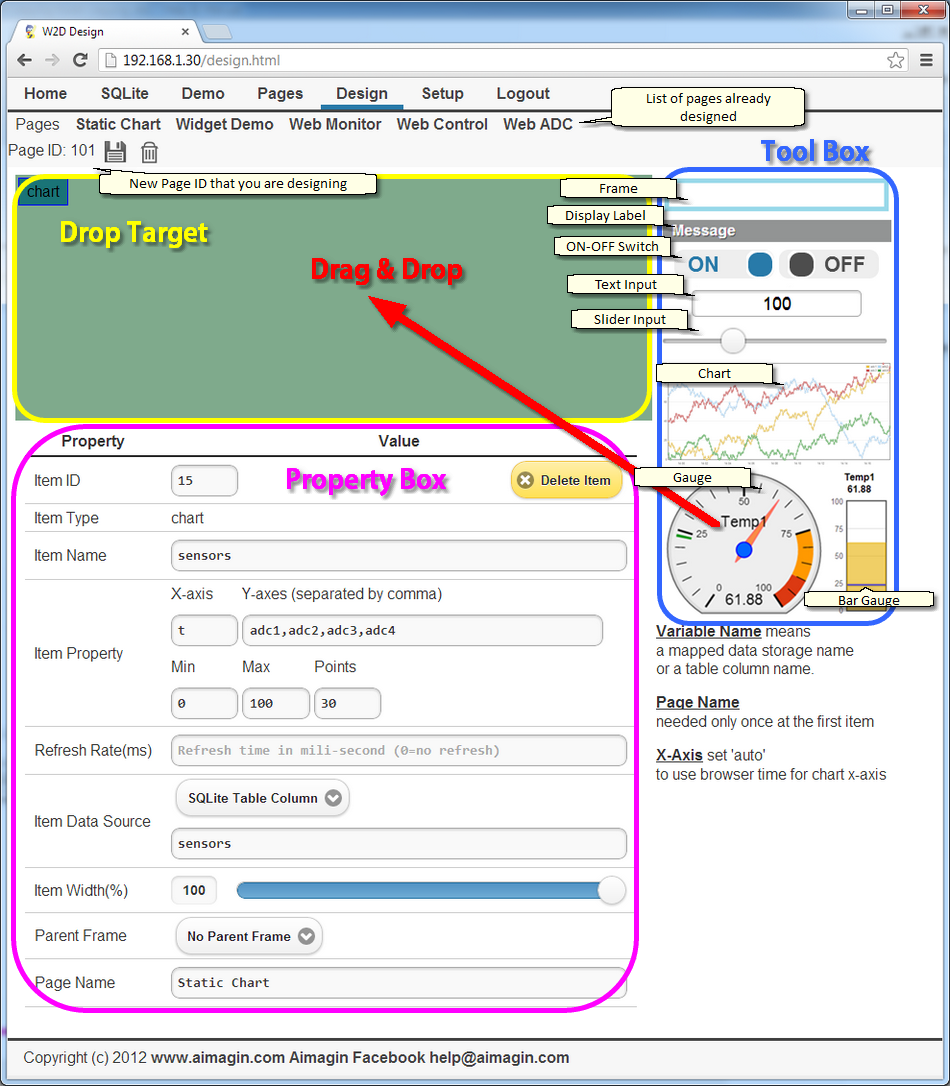
Tool Box on the right lists all available items. Drag items into Drop Target to add page component. New page will not be saved until you press Save/Update on Action Bar.

The following lists all available items and their meaning.
Items |
Behaviors |
Purpose |
|---|---|---|
Frame |
Container/Partition |
|
Display Label |
Label/General Text Display |
|
ON-OFF switch |
Digital (0,1) Input/Output |
Web Control |
Button |
Push Button Output |
Web Control |
Text Input |
Numerical/Date/Text Input/Output |
Web Control/Web Monitoring |
Alarm |
Monitor value per condition |
Web Monitoring/Alarming |
Slider Input |
Numerical Input |
Web Control |
Chart |
Chart Output |
Web Monitoring |
Photo |
Show image/photo/IP camera |
Display/Banner/Live Capture |
Map |
Show map with location pin + geolocation information/sensor |
Geolocation Information/Sensor |
Gauge |
Gauge/Set point Output |
Web Monitoring |
Bar Gauge |
Bar Gauge/Set point Output |
Web Monitoring |
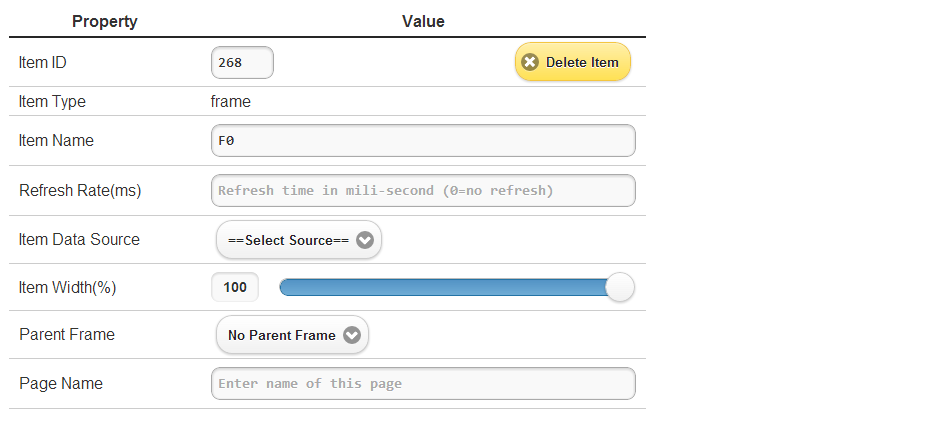
Once an item, e.g. Frame, is Dragged & Dropped into Drop Target, its properties will be listed in Property Box as shown below.
Properties |
Frame |
Display/Label |
Alarm |
|---|---|---|---|
Item ID |
ID of each item as they are dropped in, you can rearrange items by specifying id accordingly. Lower number goes to top-left. |
Leave it Default |
|
Item Name |
Name of this Frame |
Name of this label (not important, anything but blank) |
Column name (from table) where you want to monitor/control values or Variable Name from mapped data storage. |
Item Property |
N/A |
Text to display as label |
Condition (>, <, >=, <=, ==) and Comparing value |
Refresh Rate (ms) |
Amount of time in mili-second that you want this page to reload item data ( > 500 ms) |
Amount of time in mili-second that you want to recheck alarm condition ( > 500 ms) |
|
Item Data Source |
Mapped Data Storage |
Mapped Data Storage |
|
Item Data Source |
SQLite Table Column |
SQLite Table Column |
|
Item Width(%) |
Width of this item in percent of Parent Width |
N/A |
|
Parent Frame |
Name of Frame you want this item to move in |
N/A |
|
Page Name |
Name of this page (need once per page) |
Name of this page (need once per page) |
|
Note: For Alarm item, you can upload the alarm sound (small .wav) file to server via setup.html page
Properties |
Switch |
Text Input |
Slide Input |
|---|---|---|---|
Item ID |
ID of each item as they are dropped in, you can rearrange items by specifying id accordingly. Lower number goes to top-left. |
||
Item Name |
Column name (from table) where you want to monitor/control values or Variable Name from mapped data storage. |
||
Item Property |
N/A |
Number/Time Format/Default |
Property of this slide (e.g. min=0 max=100 step=0.5 value=0) |
Refresh Rate (ms) |
Amount of time in mili-second that you want this page to reload item data ( > 500 ms) |
||
Item Data Source |
Mapped Data Storage |
||
Item Data Source |
SQLite Table Column |
||
Item Width (%) |
Width of this item in percent of Parent Width |
||
Parent Frame |
Name of Frame you want this item to move in |
||
Page Name |
Name of this page (need once per page) |
||
Properties |
Chart |
Gauge |
Bar Gauge |
|---|---|---|---|
Item ID |
ID of each item as they are dropped in, you can rearrange items by specifying id accordingly. Lower number goes to top-left. |
||
Item Name |
Name of this chart (not important, anything but blank) |
Column names (from table) where you want to monitor values (allow 1, or 2 column separated by space) or Variable Name from mapped data storage (allow 1 or 2 variable name separated by space). |
|
Item Property |
|||
Refresh Rate (ms) |
Amount of time in mili-second |
Amount of time in mili-second that you want this page to reload item data ( > 500 ms) |
|
Item Data Source |
|
Mapped Data Storage |
|
Item Data Source |
SQLite Table Column |
||
Item Width (%) |
Width of this item in percent of Parent Width |
Width of this item in percent of Parent Width |
|
Parent Frame |
Name of Frame you want this item to move in |
||
Page Name |
Name of this page (need once per page) |
||
Properties |
Photo |
Map |
|---|---|---|
Item ID |
ID of each item as they are dropped in, you can rearrange items by specifying id accordingly. Lower number goes to top-left. |
|
Item Name |
Name of this Photo (not important, anything but blank) |
Name of this Map (not important, anything but blank) |
Item Property |
location URL of the source photo (can be local or remote) |
Specify name of table containing geolocation information/name Zoom level (or Auto -- cover all location points) |
Refresh Rate (ms) |
Amount of time in mili-second |
N/A |
Item Data Source |
N/A |
N/A
|
Item Data Source |
||
Item Width (%) |
Width of this item in percent of Parent Width |
Width of this item in percent of Parent Width |
Parent Frame |
Name of Frame you want this item to move in |
|
Page Name |
Name of this page (need once per page) |
|
Note: To set refresh interval and table access (real table or dv),
it is recommended to set values at 'event' and 'table' on the first Frame item.
The chart property will tell chart what Column to use as xaxis, and what Columns to use as yaxis. There can be more than one yaxis. Yaxis minimum and maximum can also be specified, as well as the number of points per each line to keep data. The default values are, min=0, max=100, point=30.
Property has these formats; (properties in square brackets are optional)
xaxis yaxis1,yaxis2,yaxis3 [min=0 max=100 point=30]
(e.g. time adc1,adc2)
The chart property will tell chart to use browser time as xaxis, and use what Columns as yaxis. There can be more than one yaxis. Yaxis minimum and maximum can also be specified, as well as the number of points per each line to keep data. The default values are, min=0, max=100, point=30.
Property has these formats; (properties in square brackets are optional)
auto yaxis1,yaxis2,yaxis3 [min=0 max=100 point=30]
(e.g. auto adc1,adc2 min=0 max=4 point=50)
Select 'SQLite Table Column' then specifying the table name and (optionally) condition for querying data from table into chart.
Property has these formats;
table_name or table_name SQLite_optional_condition [SM for SQLite Method only]
(e.g. sensors where adc1>50 or sensors limit 20)
Select 'SQLite Table Column' then specifying the table name and row condition for querying one row of data from table adding into chart, or set it to 'Mapped Data Storage' in case of Direct Method [DM]
Property has these formats;
table_name row_condition [SM]
(e.g. sensors where rowid=1)
Specifying the Minimum and Maximum as well as a Caption for Gauge or Bar Gauge. It assume min=0, max=100 and name=ColumnName/VariableName as default. Note: for dial gauge you have option to set number of major ticks and minor ticks on the gauge face.
You can load the web interface you have created from menu "Pages". List of pages available will show up under main menu as page number. "Click" to go to that page.
You can use general SQLite Statement here. This page will allow you to CREATE/DROP table, INSERT, UPDATE, DELETE, SELECT data on table. Other statements are not thoroughly tested and may or may not work. The SQLite Query Statement Input are there to help you fix and fine tuning your database table.
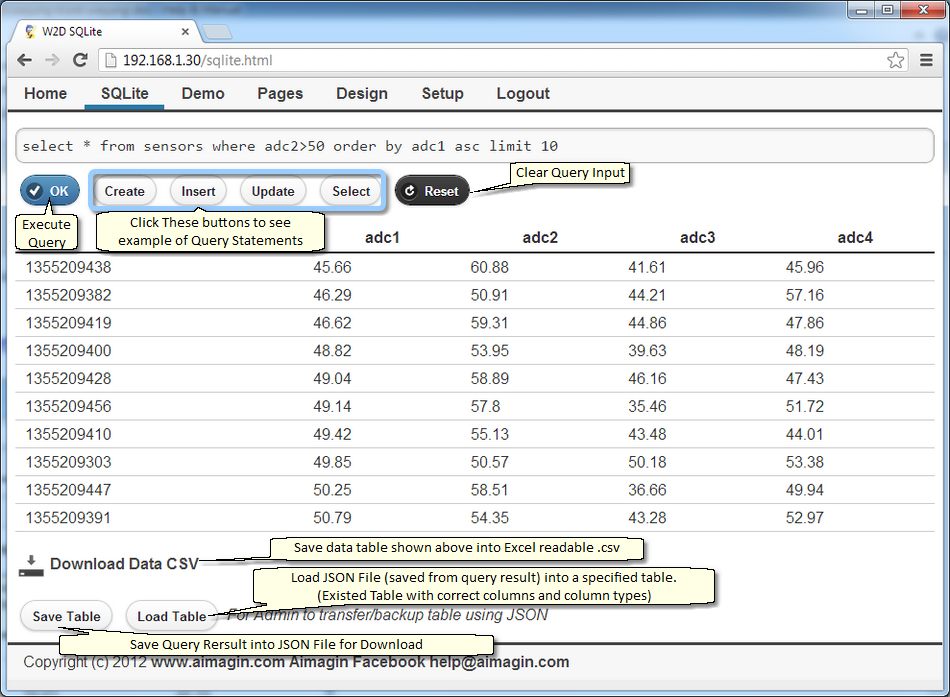
The most common uses of SQLite Query are shown (for example) here. (CAP are SQLite Keywords and NonCAP are your addition, lower case SQLite keywords also work.)
CREATE TABLE IF NOT EXISTS table_name (col1 INTEGER, col2 REAL, col3 TEXT)
DROP TABLE table_name
CREATE TABLE table_name (id INTEGER PRIMARY KEY, col2 REAL, col3 INTEGER, col4 TEXT)
INSERT INTO table_name (col2,col3,col4) VALUES (1.25,10,'your first text')
INSERT INTO table_name (col2,col4) VALUES (54.2,'your second text')
UPDATE table_name SET col2=12.5, col3=20 WHERE col4='your first text'
UPDATE table_name SET col3=30 WHERE col2=54.2
SELECT * FROM table_name LIMIT 2
SELECT * FROM table_name WHERE col3=10
SELECT col4 FROM table_name WHERE col2<10
SELECT * FROM table_name ORDER BY col3 ASC
SELECT * FROM table_name ORDER BY col2 DESC
DELETE FROM table_name WHERE col4='your second text'